Created on March 17, 2025 | Updated on June 29, 2025
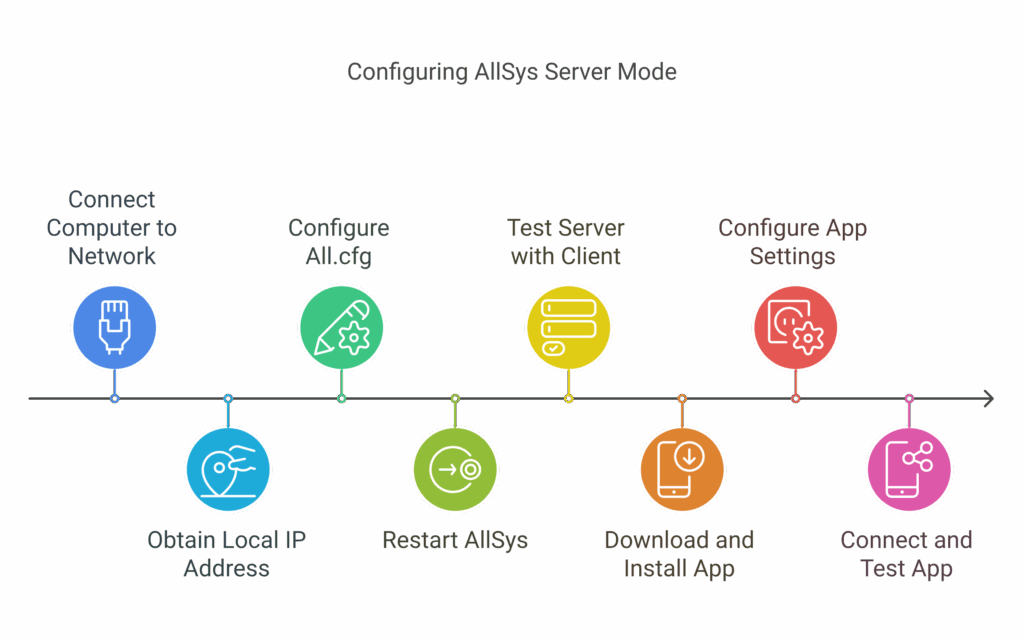
This second step explains how to configure AllSys to communicate via the local network with the ClientV2 application and the smartphone by configuring the AllSys server mode under Windows 11.

1. Connection and networks (local)
- Connect the computer on which AllSys is used as a server to your Internet router via an RJ45 cable or via router Wi-Fi.
- To easily get the local IP address of your Windows machine:
- Method via PowerShell:
- Open PowerShell (type "
powershell" in the Start menu) - Copy and paste this command:
Get-NetIPAddress -AddressFamily IPv4 | Where-Object { $_.InterfaceAlias -notlike "Loopback" } | Select-Object IPAddress - Note the local IP address displayed
- Open PowerShell (type "
- Method via Command Prompt:
- Open Command Prompt (type "
cmd" in the Start menu) - Type:
ipconfig - Look for the "IPv4 Address" line
- Note the local IP address displayed
- Open Command Prompt (type "
- Method via PowerShell:
2. Configure All.cfg in server mode
- Open
All.cfgthe directoryAllvXXX-XXwith a text editor (wordpad or notepad preferred): - Enable server mode by setting the variable
SysSockettoON, example:SysSocket=ON - Define at least one user allowed to log in:
- Add a line below the section:
List of Pseudos and PassWords of clients authorised to connect on the server :
ATTN - Only standard caracters - No special letters or accents !
- Example : SysSocketClient=John^^JohnPass
- Repeat this line for each person athorized - Example with a user:
SysSocketClient=OneUserName^^OnePassword
- Add a line below the section:
- Save
All.Cfg.
3. Restart AllSys
Close AllvXXX-XX.exe if it isn't already, then run AllvXXX-XX.exe with the changes applied.
Note : A Windows Firewall window may appear with the message "Do you want to allow AllvXXX-XX to access both public and private networks?". Check both options (public and private networks) to allow full access, then click "Allow access."
Open a database, for exemple tb :
- Type password :
00 - Open a database: go to "First contact with AllSys", if you don't how.
- Access the write mode by pressing
W
The server will only answer if you are on the write mode.
4. Test your server with the local client (ClientV2.exe)
In your AllvXXX-XX application folder, you have a Windows client "ClientV2.exe" available, you will use this client to test your server.
- In the root folder AllvXXX-XX, Run "
ClientV2.exe" - Inform:
- IP of your choice depending on the situation:
- "
127.0.0.1" if your client is on the same PC as your server. - The local IP that you noted a little higher if your client is on a different PC.
- "
- The port number:
5001 - Username and password: those defined in
All.cfg(eg: OneUserName and OnePassword). - Service: 1 (question/answer mode).
- IP of your choice depending on the situation:
- Once logged in, type "
e" then "hello+enter", expected response: "hello". You can now interact with AllSys.
5. Download and install the AllSys.apk app on your phone
- Download AllSys.apk for Android :
- Connect your phone to PC via USB, copy AllSys.apk to the Downloads folder of your phone.
- Or download it from https://allsys.io/allsysapk/ open "My Files" on the phone.
- Tap on the AllSys.APK file to install it.
- Open the app:
- Accept the notification, then tap "
<" to return to the app. - Go to the application settings (3 dots at the top right) activate all the options (recommended).
- Define a new server:
- Name: your choice.
- IP Address: The local IP of the PC (e.g.:
192.168.1.X). - Port :
5001.
- Define a new connection:
- Username and password: those of
All.cfg. - Service: Question/Answer (Q/A).
- Choose a language and a color, then validate.
- Username and password: those of
- Log in:
- Click the red left button to connect at your server.
- Send hello (via keyboard or microphone). Expected response:
hello. - You are ready to interact with AllSys.
- Accept the notification, then tap "
6. Tip: On Windows 11
- Go to Settings > System > Power and select "High Performance" mode to optimize the server.
